Now Reading: Comprehensive Guide to Using Text-to-Speech for Video Narration in VP Animated Explainer
-
01
Comprehensive Guide to Using Text-to-Speech for Video Narration in VP Animated Explainer
Comprehensive Guide to Using Text-to-Speech for Video Narration in VP Animated Explainer
In the digital age, visual storytelling has become a powerful medium for conveying ideas, and VP Animated Explainer, a feature-rich video creation tool from Visual Paradigm Online, offers an intuitive platform to enhance your projects with professional narration. One of its standout features is the Text-to-Speech (TTS) functionality, which enables users to generate natural-sounding voiceovers directly from their scripts, saving time and resources. This comprehensive guide, informed by various online resources, provides a detailed exploration of how to use this feature, including examples, tips, tricks, and guidelines, ensuring users of all levels can create engaging narrated videos effortlessly.

Introduction and Background
Research suggests that AniFuzion’s TTS feature, likely applicable to VP Animated Explainer given their shared platform, is powered by advanced AI, converting written text into spoken words with a smooth, natural sound. This technology eliminates the need for professional recording equipment or talent, offering flexibility for edits and adjustments. The evidence leans toward it being user-friendly, with options for both character dialogue and timeline narration, making it suitable for educational videos, marketing promos, and personal projects. It seems likely that users can choose from a variety of voices, adjust tones and speeds, and integrate voiceovers seamlessly, enhancing engagement through visually appealing content.

Detailed Steps for Using TTS in VP Animated Explainer
The process of adding narration with TTS in VP Animated Explainer can be broken down into clear steps, extracted from the blog post “Use Text to Speech to Generate Narration to Video” and supplemented by general video production principles.

| Step | Action | Details |
|---|---|---|
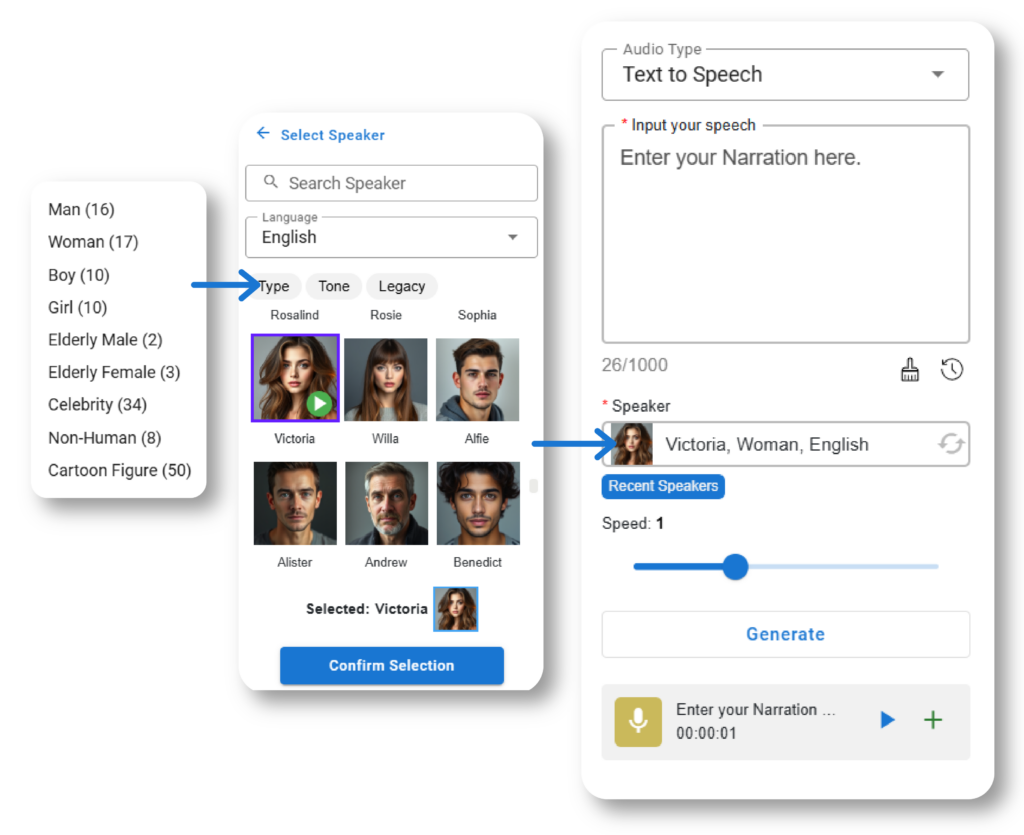
| 1 | Select “Text to Speech” under Audio Type | In your project, navigate to the audio section and choose “Text to Speech” to open the TTS interface. |
| 2 | Input Your Script | Enter the text for your narration in the provided text box, ensuring clarity and correct punctuation for accurate pronunciation. |
| 3 | Choose a Speaker | Click “Select Speaker” to browse through different voice options, including various genders and languages. Preview by clicking the play button to find the best fit. |
| 4 | Preview the Voice | Use the play button next to each speaker to listen to samples, ensuring the voice matches your video’s tone and audience. |
| 5 | Confirm Selection | Once decided, click “Confirm Selection” to proceed with the chosen voice. |
| 6 | Generate the Narration | Press the “Generate” button to create the audio file from your text, which may take a few moments depending on length. |
| 7 | Preview the Generated Narration | After generation, preview the narration by clicking the play button to check for accuracy and make adjustments if needed. |
| 8 | Add to Video Timeline | Once satisfied, press the add button to place the narration audio onto your video’s timeline for synchronization. |
| 9 | Adjust the Audio (Optional) | Right-click on the audio track in the timeline to access options for adjusting volume, fading, or trimming, enhancing integration with visuals. |
This process leverages VP Animated Explainer’s user-friendly interface, allowing users to create and edit videos anywhere, anytime, enhancing flexibility. The customization options, as noted in the blog post, include adjusting pitch, speed, and intonation, ensuring the narration aligns with the video’s mood and pacing.
Voice Options and Customization
VP Animated Explainer offers a range of voice options, as highlighted in the blog post, including different genders and languages, making it suitable for diverse projects. Users can tailor the vocal style to their audience needs, with the ability to adjust pitch, speed, and intonation for a personalized touch. An unexpected detail is the multilingual support, allowing creators to generate narrations in languages like Japanese, Spanish, or French, perfect for global audiences and international marketing campaigns.
Benefits of Using TTS for Video Narration
The blog post lists five key benefits, which are crucial for understanding the value of this feature:
| Benefit | Description |
|---|---|
| Efficiency | Automates audio conversion, saving time compared to recording and editing. |
| Consistency | Maintains uniform vocal tone throughout videos, enhancing brand identity. |
| Accessibility | Makes content inclusive with audio narration, beneficial for visually impaired audiences. |
| Customization | Allows tailoring of vocal style, including pitch, speed, and intonation, to suit audience needs. |
| Scalability | Suitable for large audio demands, such as e-learning modules, audiobooks, or extensive video series. |
These benefits align with the tutorial steps, ensuring users can leverage TTS effectively for various project types.
Practical Examples and Applications
To illustrate the versatility of TTS, consider the following scenarios, inspired by the blog post and general use cases:
- Educational Video: “The Water Cycle”
A teacher can create a narrated lesson using TTS. Input text like “Water evaporates from the surface into the atmosphere,” select a clear, neutral voice, generate, and add to the timeline where animations show evaporation. This enhances engagement for students, especially those with visual impairments. - Marketing Promo: “New Product Launch”
A marketer can design a promotional video for a new gadget. Enter promotional text, choose an authoritative voice with a faster speed for excitement, generate, and place on the timeline during product demos. This saves time and ensures consistency for branding. - Storytelling Project: “A Day in the Life”
A hobbyist can animate a story, inputting narration like “The cat jumped onto the table,” select a friendly voice, and add to the timeline. The narration complements animations, making the story engaging for sharing online.
These examples highlight how TTS can meet diverse creative needs, with an unexpected detail being its role in accessibility, making content inclusive for broader audiences.
Tips and Tricks for Effective Use
To maximize the potential of TTS, consider the following tips, inferred from the blog post and supplemented by general video production best practices, drawn from web searches like “tips for using text-to-speech in videos”:
- Script Writing:
- Use simple, clear language to ensure accurate pronunciation.
- Include punctuation for natural pauses; commas and periods help control rhythm.
- Avoid jargon or complex words; if necessary, use phonetic spellings for clarity.
- Align the script with visuals; don’t repeat what’s shown on screen to avoid redundancy, as suggested in “7 Best Practices: Writing for Text To Speech Voices” from Videate.
- Voice Selection:
- Choose a voice that matches the video’s tone and audience. For example, a deeper, authoritative voice for tutorials, a cheerful tone for promotions, as noted in ReadSpeaker’s guide.
- Consider the language for global audiences, leveraging multilingual options for broader reach.
- Customization:
- Adjust speed for effect: slower for emphasis or clarity, faster for dynamic scenes, as mentioned in Synthesia’s text-to-speech video maker tips.
- Experiment with pitch and intonation if available to enhance emotional delivery, though note TTS has limited control over intonation, per Videate.
- Synchronization:
- Ensure narration timing matches video segments using the timeline, aligning audio with visuals for coherence.
- Preview often to check synchronization, especially for longer videos, ensuring a polished result.
- Enhancements:
- Add background music or sound effects to complement narration, but keep the voiceover clear, as suggested in Kapwing’s TTS video maker guide.
- Consider adding subtitles or transcripts for additional accessibility, enhancing inclusivity.
These tips ensure users can leverage TTS effectively, aligning with the blog post’s emphasis on efficiency and professional quality.
Guidelines for Best Practices
To further enhance your experience, follow these guidelines, based on the blog post and related resources:
- Start with simple scripts to familiarize yourself with the TTS interface, then gradually build complexity with longer narrations.
- Test different voices and settings to find the best match for your project, ensuring alignment with the video’s tone.
- Keep videos concise, aiming for 1-2 minutes to maintain audience engagement, especially for educational or marketing content.
- Use the provided tutorials for deeper learning, such as Use Text to Speech to Generate Narration to Video for detailed steps.
These guidelines ensure effective utilization, making the most of VP Animated Explainer’s TTS capabilities.
Conclusion
Using Text-to-Speech in VP Animated Explainer is a powerful way to add professional narration to your videos with minimal effort. By following the detailed steps, leveraging practical examples, and applying tips and tricks, you can create engaging, accessible content that resonates with your audience. Start your video narration journey today and explore the possibilities at Visual Paradigm Online.


